


How To Become a Better Photographer This Year
(The Long Version)

Madison is looking at you like that because she wants to know if you're going to stick to these resolutions, like you're supposed to.
Now that 2017 has come and gone, and you've made a list of all the photo gear you want to get this year (or already got during the holidays), it's time to take 10 minutes and focus on what really matters.
How will you become a better photographer this year?
“When the student is ready the teacher will appear. When the student is truly ready... The teacher will Disappear.”
― Lao Tzu
Luckily, we've got some great tips to get you started. You don't have to do all (or any) of these, but we'll bet you a 1923 Leica O-Series that if you do, you'll become a better photographer.

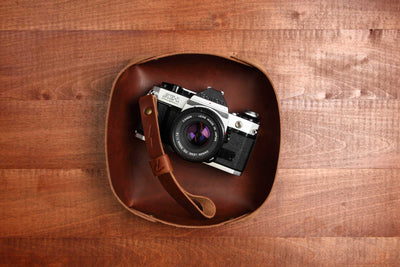
Our 35mm Wood Camera, surrounded by various types of films you should try shooting.
1) SHOOT FILM
Bust out that old 35mm - or find yourself a used one - and start shooting film (again)
Film photography is making a huge comeback, and for several good reasons. People love the mechanical, tactile and analog nature of the medium, and it's an incredible contrast to the somewhat emptiness-inducing process of taking a digital photograph.
Also, the tones, contrast, grain and overall look and feel of a film photograph can't really be perfectly emulated, no matter how many filters and film "emulations" those whiz kids in Silicon Valley come up with. In the end, a real film photo is very different than a digital photo with a "film-type filter" on it.
But the real reason that you should shoot film is that it will make you a much better photographer - even if you go back to shooting only digital afterwards.
It's very simple really: shooting film forces you to slow and down and consider each shot carefully. The nature of the entire process from start to finish enforces a slower, more deliberate approach. You only have a couple dozen frames in each roll, each shot costs you money, and it takes a week or so to get your film back from the lab (or to save up a bunch of rolls to process yourself) to see what you actually captured.
By it's very nature, shooting film photographs makes you consider your subject, framing, angle, composition, lighting, textures, and contrast much more than shooting digital. After all, you only get one shot at each frame, and there's no hey-there's-zero-marginal-cost-so-let's-just-take-a-million-shots-and-pick-the-best-one false psychology going on like there is with digital photography.

Our ISO 800 Enamel Pin with the very photogenic Canonet QL GIII 35mm Rangerfinder Film Camera. This camera was such a hit, over 1 million were sold between 1972 and 1982.
How To Do It
A lot of you already have a film camera buried in a closet somewhere, or you can get one from your parents/grandparents/uncle/whoever that they haven't used in a million years. Trust me, they'll happily give it to you. At this point, most people assume film photography died forever a long time ago, and they have no plans to start shooting film again (but you do!).
If you still need to find a camera, there's a bunch of options: eBay, Craigslist, Amazon, your local camera shop, your local thrift shop or Goodwill/Salvation Army store, and so on.
A decent functioning 35mm SLR will go from anywhere from $30 - $150 (and a lot more, for collectibles), but you're just looking for something that works.
Then, grab a roll of film, pop it in, and start shooting. Even better, commit to shooting at least one roll every month (or more if you're up to it), and you'll see your photography improving even faster.
2) KEEP A PHOTO JOURNAL
Record what you hope to accomplish, how you plan to get there, and what you end up shooting each week.
This one requires a small notebook, a little bit of time, and consistency.
Get yourself a small notebook of any kind. Now, put it away and spend 5 minutes imagining the kind of photos you want to take this year. At the end of the year, what kind of photos would you be proud to print large, frame, and hang on your wall?
Ok, now think through the steps required to get those photos. For example, if you're goal is to take some incredible landscape photos this year, then the steps would be something like this:
1) Step 1: Set aside some specific days to spend pursuing the making of these photos.
2) Step 2: Research good locations to try shooting at.
3) Step 3: Make a list of people you'll ask to join you (it's always more fun with friends)
4) Step 4: Make a list of the gear you'll need (tripod, shutter release, ND filter, etc) and note which ones you do no already have.
5) Step 5: Set aside a few hours to watch tutorials on how to get the best landscape photos.
(Obviously, these steps can be applied to any kind of photography - portraits, cityscapes, etc. The point is to have a step-by-step checklist to make sure you reach your goal).

These PhotoMemo Notebooks from ShootFilmCo were specifically made for keeping track of your notes on all things photographic. You can use it to track technical data from film shoots, or just to write down thoughts, goals, and steps. Photo via ShootFilmCo.
Another thing you will put in your photo journal is a record of the actual photographs you did end up taking. This can seem boring in the short term but is really really useful in the long-term. After every big shoot (where you spent a lot of time and effort on getting some good shots), wait a few days, and then sit down and look at the resulting images.
(It's important to wait a few days to give yourself emotional distance from the process of taking the photos, so you can focus purely on the final outcome).
After you've had a chance to mull over the final images, compare the results to what you were hoping to get before you started.
THEN... write down why you did or did not succeed in getting the shots you wanted. Write down everything - why you love or hate them, what you think made them so good/bad, what you'll do better next time, and tips and reminders to yourself about the most important lessons you learned.
This last part will be extremely valuable next time you're setting out to take a set of photos (which, let's face it, might be months later...). It'll save you tons of time in figuring out what to do differently to get better results, and you'll basically be starting your shoot at already a new level of experience, not having forgotten what you learned last time.
3) SHOOT PRIMES
Whether film or digital, pick one fixed lens and use it for a whole month (or year).
We've talked about this before, but shooting exclusively with prime lenses makes you a better photographer faster. Yes, there are some cases where you might need a zoom (weddings, sports, etc), but by and large, the vast majority of the time a zoom is completely superfluous and only serves to make you lazier, and your photography worse.
The fundamental building blocks of any photograph are exposure, composition/framing, and subject matter. Shooting on a prime lens will help you get better at all of these, but particularly the last two. Not having the option to zoom, and forcing yourself to compose with the frame that you have makes you a better photographer by teaching you how to look for a compelling composition.

A photo of our 1980's Tee, captured with a fixed focal length Canon 85mm f/1.L. I would have never taken this shot with a zoom lens, because I would have been trying to get the whole scene in the frame, and taken a much worse shot.
Sometimes, this means you realize that the thing you thought was going to be a good photo actually isn't, because in looking through your fixed frame, you realize there's no way to capture this subject in the current lighting in the way you envisioned. So you move on, and take a better photo somewhere else.
Compare that to spending 15 minutes zooming in and out with your kit lens to try to get the composition you want, only to realize when you download your photos the next day that none of the photos is any good and you shouldn't have wasted your time.
I don't know about you, but I'd rather be spending my time making great photographs than trying desperately to take any photograph.
How To Do It
Which prime lens to pick, you ask? Well, there's a few great options out there depending on what kind of stuff you want to shoot. But in general, you can't go wrong with any of the following:
1) 24mm lens
2) 35mm lens
3) 50mm lens
4) 85mm lens
Once you find the right lens for your camera, all you gotta do is commit to shooting only on this one lens. Do it for at least a month. If you don't shoot very often, keep in on there for 3 or even 6 months.
You'll be amazed at how quickly your photography skills develop, no matter what level you're already at, when you're forced to learn to work with a single focal length, and as a result, you become a master of composition and framing.
4) SHOOT ONLY BLACK & WHITE
Make only black & white photographs for as long as you can.
Obviously, this doens't apply to you diehard #blackandwhiteisworththefight shooters out there, but for everyone else, it's most certainly worth a trip to the dark (and light) side.
Whether you shoot film or digital, this is one anyone can do. Heck, you can even do it on your phone. (Just set it to "monochrome").
Shooting in black and white exclusively for a while does two things:
1) First of all, it helps train your eye for great composition, framing, texture, contrast and creative use of shadows and light. Because you don't have the (some would say) cheap gimmick of bright colors to fall back on to make a photograph "pop", you are forced to focus exclusively on the most basic elements of a photograph - composition, and the play of light and shadow.
While similar to the way in which shooting only prime lenses helps train your eye to become a better photographer, shooting in black and white has the added advantage that you really start to notice and look for patterns, textures, and surfaces. In other words, the things that make a 2-dimensional photograph either 3-dimensional, or completely flat (both of which are great).
2) The second thing shooting black and white does is it opens up your creative horizons. By forcing you to find a way to take a great photograph of something very colorful in simple monochrome, you become much more adept at making great photos where others (and previously, you) would see nothing to photograph. You can see great photos based on elements that you would have never noticed before, and you can make them happen because you aren't distracted by very distracting things such as color, light hue, color temperature, haziness, etc.

A photo of our 35mm Mugs, shot on a 35mm camera with Ilford HP5. Those of you that have one know that the one in the front is bright red. But this doesn't matter in this photograph, which is more about the framing and composition.
And finally, as if you need more convincing, I'll let you in on a little secret...
Once you learn to shoot black and white well, you will be able to make incredible photographs where once you would have only made very mediocre color photos.
Why is this? Because haziness, bad light temperature, fog, harsh sunlight, sharp contrast and distracting backgrounds don't ruin a black & white photograph like they do a color one - in fact they often make it better.
Don't believe me? Just try shooting black and white for a month or two and you'll see....
How To Do It
1) If shooting film, just pick any black and white film stock to get started. I personally love Ilford HP5 and JapanCameraHunter's StreetPan
2) If shooting digital, just set your camera's settings to "Monochrome". NOTE! It's very important that you actually shoot in black and white, and not shoot in color and convert to black and white later on your computer. (For you know-it-alls, yes, I know that your camera is converting it to black and white in the camera, and if you're shooting RAW it doesn't matter, but just hold on a minute, will you and you'll understand...)
The reason why this matter is because (practically) everyone who uses a digital camera tends to "chimp" or look at the photos on the LCD while they're shooting. By shooting exclusively in Black & white mode, you're seeing the phtoos you take in black adn white, and learning to train your brain to look for the elements that make a black and white photo great, not a color one (yes, they are very different elements).
3) Keep shooting in black and white exclusively for at least a month (3-6 months if you can swing it), until you start to see and think only in black and white. You'll know when this happens and you'll develop the ability to "turn off" your perception of color when framing a photograph to focus on non-color elements I described above (texture, composition, contrast, shadows, etc). When this happens, you will have achieved Monochrome Mastery - a level of photographic insight that is not hard to reach, but which few have attained.
Yeah this list is getting long, but you know what? You've spent months or even years trying to become a better photographer, and the 15 minutes you spend reading this will save you months and years on your journey.
5) SHOOT SOMETHING NEW
Take deliberate photos of something you would normally never shoot.
This one's really easy. If you normally shoot a lot of landscapes, start shooting portraits. If you shoot a lot of macro, go do some night shots. Whatever it is, make sure it's very different that what you're comfortable with, and go shoot a ton of it.
By pursuing the goal of making good photographs of something completely new that you're not used to photographing, you will do a couple things: 1) You'll expand your horizons and become a more well rounded photographer, and 2) You'll realize why there are professional underwater photographers, professional food photographers, professional war photographers, and so on.

Just get out there and shoot, like Kenny here in South Philly. And if you have one, wear your Nifty Fifty Tee.
"Photographer" is a very misleading term, for many reasons. But the main one is that it doesn't tell you what kind of photographer someone is. It's like when someone says they're having a chef make dinner at their house tonight. Ok, but what kind of food is it gonna be? If I was expecting Italian and you bring a sushi chef, it's not going to be a very good fit.
Just like if I need a "photographer" to shoot my wedding and I hire my friend who shoots mainly product photos for ecommerce brands. Might not work out so well.
So, whatever you normally like to shoot, pick something completely different and spend a couple weeks trying to make great photos of it.
Tip: If you're not sure where to start, just go out at midnight and start taking photos. It'll be a lot harder than you thought.
6) JUST ONCE, PLAN EVERYTHING
Envision, plan, and execute a photoshoot from start to finish
I'm willing to be the vast majority of you reading this post (btw if you've made it this far, congrats - you truly must have nothing better to do today) are not professional studio photographers. If you are, feel free to skip to the next item.
The vast majority of amateurs, semi-professionals and other non-professional photographer I've encountered in my life all have one thing in common: they've never envisioned, planned, and executed a photoshoot from start to finish.
Most of us kind of just look for opportunities that come our way and try to make the best photos we can while the going is good.
Well, just for once, you should do it completely differently. Make yourself envision, plan and execute a full photoshoot from start to finish, where everything is planned out ahead of time and you have a specific photo you're looking to create.

Getting this photo of our 35mm Camper Hat only took me about 2 days, 3 separate shoots, a tripod, a tethered laptop, 2 strobes, over 500 practice images and waiting for some clouds to move out of the way. Yeah, it might have taken me way too long but so what? It was my first time doing this kind of shoot. And just look at that final result...
It'll give you an appreciation for how much work goes into stylized, studio and planned photoshoots, especially ones where you're working with an art director or other client who has a very specific vision of what the final product should be.
Plus, it'll teach you some discipline and help you realize that photography isn't always fun and games - sometimes you have to really push yourself to get the exact result you want - and it usually doesn't come easy.
There's nothing wrong with doing mostly unplanned photoshoots - heck, that's all I do these days - but there is a real value to taking the time to figure something out from scratch and push through to the final result to see if you can do it.
So, whether it's a stylized food shoot, an in-studio portrait shoot with professional lighting, or any other planned photo shoot, go ahead and try it.
How To Do It:
1) Pick a general subject you want to make a photo of (something you find interesting and want to portray in a new light).
2) Close your eyes and envision what the final photo or series of photos might look like.
3) Do some research to see what tools you might need to achieve the specific look (some possibilities: a tripod, an off-camera flash, props, backgrounds, a model, etc).
4) Meticulously plan out the shoot with a big checklist of everything you'll need for it.
5) If shooting with an inanimate object, set aside some time (a few hours) and go ahead and start experimenting towards the final look you want.
6) If shooting with a model or someone with whom you have limited time, do a dry run first so you can catch any issues that might pop up before the big day
7) Once all is said and done, sit back and look at your photos and honestly judge if you got what you were envisioning when you started.
8) If you did, congrats you're a rockstar (either that or you didn't imagine something very difficult). If you didn't, write down where things went wrong and what mistakes you made or things you underestimated.
7) TAKE SOMEONE'S PORTRAIT
There's something different about photographing people.
Obviously, if you're a famous portrait photographer, this is not going to apply to you. But the vast majority of us aren't portrait photographers, and we often hesitate to ask people if we can take their picture.
This is very common especially for beginner photographers, and it's completely natural. Asking someone to trust you to make a good photograph of their face is like asking a stranger to eat something you just cooked - it involves the gratuitous assumption of trust which isn't inherently justified.
And having the courage to take someone's photo and then show it to them to see if they like it is a whole different thing.
But here's the thing - if you never ask someone if you can take their portrait, you'll never begin on the long, rewarding journey of learning how to photograph people.
Taking photos of people is hard. Take great photos of people is even harder. It takes years of practice and working with dozens of "models" (meaning anyone who models for you, not necessarily professional models). And it takes a lot of bad photos of people that they hate, or you hate, or everyone hates, before you learn how to take great photos of people.
Because of the unique nature of portraits - and how we connect to them - taking portraits is composed of many elements, each of which can matter tremendously. After all, it's the only type of photograph where we're looking at a picture of a single human, who it typically looking back at us, but is frozen in time.
Lighting, shadows, posing, angles, expression, positioning, look, dress, eyes, etc... all matter. All these things you never have to worry about with any other type of photograph.

Sasha is wearing our Photography [Since 1827] Tank Top. Shot on Ilford HP5 on location here in Philadelphia.
It'll take you years to perfect each of these elements and place yourself among the great portrait photographers. But along the way, you'll find yourself getting better and better, until you reach the point where you can confidently say to someone, "I'd like to take your portrait" and instead of looking at you like you're crazy, they'll enthusiastically agree.
And you'll discover that there's nothing quite as fun and rewarding as working together with another human being to make a work of art together that could not exist without the collaboration that you both so trustingly ventured on.
So, if you haven't yet embarked on this particular path just yet - don't wait another minute. 2018 is the year you're going to take your first portrait of someone, and your second, and your fifth and your tenth.
How To Do It:
1) Ask a bunch of people you know (friends, family, coworkers, neighbors, whoever) if they have a few minutes for you to meet up so you can take their portrait. Tell them that you're practicing and need subjects to shoot (don't say "models" - people tend to be scared off easily.. "But I'm not a MODEL!").
2) When they all say no (because they will), ask them again and put a deadline on it. ("I've got to shoot 3 portrait sessions for my intro to photography class by the end of the month. PLEASE help me out.")
3) Promise that you'll share the best photos with them (and do it) and tell them that you want their feedback. Ask them what they like and don't like about the photos. Then separate all the personal criticalness of how they don't like how they look from the actual photographic critique on how the photo could have been better. Ignore the former, focus on the latter.
4) Show the results of your first few shoots (only the best 3-5 photos) to as many people as possible and push for real feedback. Ask them if the posing, lighting, look, angle, etc are good or not. Ask them what their gut emotional reaction is to each photo. Take notes.
5) Schedule 10 more shoots before the end of the year and complete them, each time sending the final photos to the models in a timely manner (2-3 weeks max), so you build a reputation as a reliable, trustworthy partner in art.
6) Rinse and repeat, always maintaining a respectful, professional attitude towards everyone you work with, and always seeking input from your models and your viewing audience on how to make a better portrait.
8) KEEP IT FUN
Remember why you're on this journey
A lot of these resolutions focus on pushing yourself to try new things or things you're not comfortable with. And this is very important if you want to become better at anything, particularly photography.

James is laughing because he can't believe you actually read this far down... Just kidding, it's because his shirt says "35mm" but his camera is not.
But it's also important to always keep it fun. Photography should be something you enjoy. Push yourself often, until you get to each new level, but then be sure to relax and enjoy it - and try out stuff just for fun, without an agenda to always be improving.
You'll soon discover that a lot of your best photos come when you least expect them, just like many geniuses have their breakthroughs when they're not thinking about their subject directly.
If you let photography become a chore or just a job, it'll be just like any other chore or job - you'll be doing it because you think you have to, not because you want to. Ask any successful profesional photographer who's been at it for years and they'll tell you - the trick is to love what you do. Don't go down the path of shooting 50 weddings a year if you don't love shooting weddings. Shoot something else instead.
Keep it fun, keep yourself challenged, keep your mind and creativity stimulated, and you'll enjoy doing this for a very long time.
And of course, while you're at it, get yourself some cool gear to keep you inspired :)
--------------------------------------------------------
I hope you enjoyed this list of resolutions. But more importantly, I hope you found them useful and that you commit to at least a few of them.
If you made it this far, you deserve a reward. Use code RESOLUTIONS18 to get 18% Off any order in the store.
What do you think - was this article helpful? Let me know what you think in the comments below.
Want to get our posts in real-time? Join our Newsletter..


I plan on doing several of these this year. Great and fun post!
A nice list – definitely a cut above most of the photo resolution lists that turn up this time of year. My own challenge for this year is a completed photo project.
Amazing. This will be a great reference for me for a long time. I heart your gear too.
Leave a comment